https://www.howtoforge.com/tutorial/building-and-publishing-custom-docker-images
In the first and second part, we covered the fundamentals of running a container by preparing our system for managing docker containers and what exactly it means to use a docker container against other virtualization technologies from a technical perspective. Then, on the third part, we went hands on with docker images, learned the basics and created our first Notepad container using either WordPress or DokuWiki.
In this fourth part, we are going to see how docker images are built
and we will create our own custom image ready to be downloaded and
shared with our friends, colleagues and communities.
For this tutorial, we will use the Whale Docker image. The Whale is the official mascot of Docker and the Whale docker image resembles the cowsay program which generates ASCII pictures of a cow in the terminal with a message. It can also generate pictures using pre-made images of other animals, such as Tux the Penguin, the Linux mascot.
To create a custom image by using a base image, we need to provide the docker engine with instructions on how to install and configure packages and files and also some settings that go with it. These instructions are written in a plain text file called “dockerfile”. Dockerfiles are like recipes that you hand over to a chef and he/she cooks you a great meal. These docker files are written using a simple, descriptive set of steps that are called “instructions”. Each instruction creates a new layer in our image. Instructions include actions like running a command, adding a file or directory, what process to run when launching a container from the image, etc. This process is just like you would set a series of commands in a shell script. Once you request the building of an image, the Docker reads the dockerfile executes the instructions, and returns a final image.
First, fire up a terminal and create a new folder by typing:
Get inside to your new folder with:
The next instruction that we will add will give the ability to our whale to tell a fortune. To accomplish this task, we will use the fortune package that is available in the Ubuntu repositories (remember that the whale image is based on a Ubuntu image). The fortunes program has a command that prints out wise sayings for our whale to say.
So, the first step is to install it. To do this we add the usual apt install instruction:
And we are done! Now save the file and exit.
You can verify what you did by running "cat Dockerfile" so as that your Dockerfile looks like this:
You can verify that your Docker image is indeed stored on your computer with:
To do so, you will need the ID and the TAG of your “my-docker-whale” image.
Run again the "docker images" command and note the ID and the TAG of your Docker image e.g. a69f3f5e1a31.
Now, with the following command, we will prepare our Docker Image for its journey to the outside world (the accountname part of the command is your account name on the Docker Hube profile page):
Next, use the "docker login" command to log into the Docker Hub from the command line.
The format for the login command is:
Now you can push your image to the newly created repository:
As you remember from the previous part, to remove a docker image, you must run the "docker rmi" command. You can use an ID or the name to remove an image:

In the first and second part, we covered the fundamentals of running a container by preparing our system for managing docker containers and what exactly it means to use a docker container against other virtualization technologies from a technical perspective. Then, on the third part, we went hands on with docker images, learned the basics and created our first Notepad container using either WordPress or DokuWiki.
For this tutorial, we will use the Whale Docker image. The Whale is the official mascot of Docker and the Whale docker image resembles the cowsay program which generates ASCII pictures of a cow in the terminal with a message. It can also generate pictures using pre-made images of other animals, such as Tux the Penguin, the Linux mascot.
Introduction to Docker Files
In the previous part, we introduced ourselves to the Docker Hub and learned that it is a cloud-based centralized resource for container image discovery, image building, and distribution of those images. We also learned that a docker image is a multi-layer image on top of a base image. That said, using a base image removes the hassle of creating from scratch a suitable OS for docker image and gives us the option to customize the upper layers where our software will reside.To create a custom image by using a base image, we need to provide the docker engine with instructions on how to install and configure packages and files and also some settings that go with it. These instructions are written in a plain text file called “dockerfile”. Dockerfiles are like recipes that you hand over to a chef and he/she cooks you a great meal. These docker files are written using a simple, descriptive set of steps that are called “instructions”. Each instruction creates a new layer in our image. Instructions include actions like running a command, adding a file or directory, what process to run when launching a container from the image, etc. This process is just like you would set a series of commands in a shell script. Once you request the building of an image, the Docker reads the dockerfile executes the instructions, and returns a final image.
Building a Docker Image
There are two ways of building your custom Docker image. You can either build it on your computer or you can use the Docker Hub that we talked about previously. In this part, we will learn how to build our Docker image locally and then publish it on the Docker Hub Registry.Building Locally using a Dockerfile
We will create a custom Docker Image using the "Whale say " image which is a small Docker Image (based on an Ubuntu Image) which when you run it, it says something that you programmed to say back to you.First, fire up a terminal and create a new folder by typing:
mkdir mywhale
This directory serves as the “context” for your build. The context
just means that it contains all the things that you need in order to
successfully build your image.Get inside to your new folder with:
cd mywhale
and create a Dockerfile in the folder by typing:
touch Dockerfile
Now you should see the empty Dockerfile that we created if you give 'll' command:
ll
$ ll
total 8.0K
-rw-rw-r-- 1 user user 0 23:26 Dockerfile
Open it with your favorite text editor and add:total 8.0K
-rw-rw-r-- 1 user user 0 23:26 Dockerfile
FROM docker/whalesay:latestThis first line of instruction, with the FROM keyword, tells Docker which image your image is based on. You are basing your new work on the existing whalesay image.
The next instruction that we will add will give the ability to our whale to tell a fortune. To accomplish this task, we will use the fortune package that is available in the Ubuntu repositories (remember that the whale image is based on a Ubuntu image). The fortunes program has a command that prints out wise sayings for our whale to say.
So, the first step is to install it. To do this we add the usual apt install instruction:
RUN apt -y update && apt -y install fortunesOnce the image has the software it needs, you instruct the software to run when the image is loaded. To do this we add the following instruction:
CMD /usr/games/fortune -a | cowsayThe above line tells the fortune program to send a randomly chosen quote to the cowsay program
And we are done! Now save the file and exit.
You can verify what you did by running "cat Dockerfile" so as that your Dockerfile looks like this:
cat Dockerfile
FROM docker/whalesay:latest
RUN apt-get -y update && apt-get install -y fortunes
CMD /usr/games/fortune -a | cowsay
Now that everything (hopefully) looks good, its time to build our
Docker Image (don’t forget the . period at the and of the command).:RUN apt-get -y update && apt-get install -y fortunes
CMD /usr/games/fortune -a | cowsay
docker build -t my-docker-whale .
The above command takes the Dockerfile in the current folder and builds an image called “my-docker-whale” on your local machine.You can verify that your Docker image is indeed stored on your computer with:
docker images
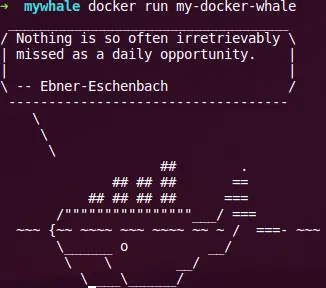
Then you may run your Docker image by typing the following:
docker run my-docker-whale
Once it runs, you will get something like the following image
Publishing your Custom Docker Image on Docker Hub
Your next option is to publish the created Docker image on the Docker Hub Repository. To do so, you will need to create an account on the Docker Hub signup webpage where you will provide a name, password, and email address for your account. I should also point out that the Docker Hub service is free for public docker images. Once you have created your account, you can push the image that you have previously created, to make it available for others to use.To do so, you will need the ID and the TAG of your “my-docker-whale” image.
Run again the "docker images" command and note the ID and the TAG of your Docker image e.g. a69f3f5e1a31.
Now, with the following command, we will prepare our Docker Image for its journey to the outside world (the accountname part of the command is your account name on the Docker Hube profile page):
docker tag a69f3f5e1a31 accountname/my-docker-whale:latest
Run the "docker images" command and verify your newly tagged image.Next, use the "docker login" command to log into the Docker Hub from the command line.
The format for the login command is:
docker login --username=yourhubusername --email=youremail@provider.com
When prompted, enter your password and press enter.Now you can push your image to the newly created repository:
docker push accountname/my-docker-whale
The above command can take a while to complete depending on your
connection's upload bandwidth as it uploads something like 180ΜΒ of data
(in our example). Once it has completed, you can go to your profile on
Docker Hub and check out your new image.Downloading your Custom Image
If you want to pull your image from your Docker Hub repository you will need to first delete the original image from your local machine because Docker would refuse to pull from the hub as the local and the remote images are identical.As you remember from the previous part, to remove a docker image, you must run the "docker rmi" command. You can use an ID or the name to remove an image:
docker rmi -f a69f3f5e1a31
Now that the image is deleted you can pull and load the image from
your repository using the "docker run" command by including your account
name from Docker Hub.
docker run accountname/my-docker-whale
Since we previously deleted the image and it was no longer available
on our local system, Docker will download it and store it in the
designated location.Summary
In this part, we learned how to create a Docker file, write some basic instructions and the build and image using it as a recipe. We also covered the basics of pushing our new custom image to the Docker Hub registry and the pulling it to our local machine. In the next part of this series of Docker tutorials, I will showcase how we can automate the image building procedure so that we can instantly create custom images any time we need them! Stay tuned.
No comments:
Post a Comment